Saturday 31 August 2013

Saturday 31st August. not much done but lots of visitors!

Well today was the day I had been dreading. The only way to replace the seriously worn diff pin was to cut into the box section under the fuel tank, then grind the head of the pin off and then also cut the weld that holds the pin from underneath the car too.
I had to break off at lunch time to go and collect the buyer of the Red Shed. I know this will come as a shock after all of the hard work I've done on the car, but I'm also looking to move house soon too and finding somewhere to garage three cars would be very unlikely, so one had to go. Gertie is without doubt my favourite with the estate a close second, so the red car was on the for sale list.
The new buyer was very happy with her (I'll let him reveal his identity if he wants to) and while he was there Lee Godfrey and Dave Harvey called in for a cuppa as they were also in the area looking at a MK2 saloon.
Gavin arrived shortly after and started helping me remove the diff pin. The bit I hated was having to cut into the rear box section to access the pin. This will have to be welded up again when the new pin is fitted.
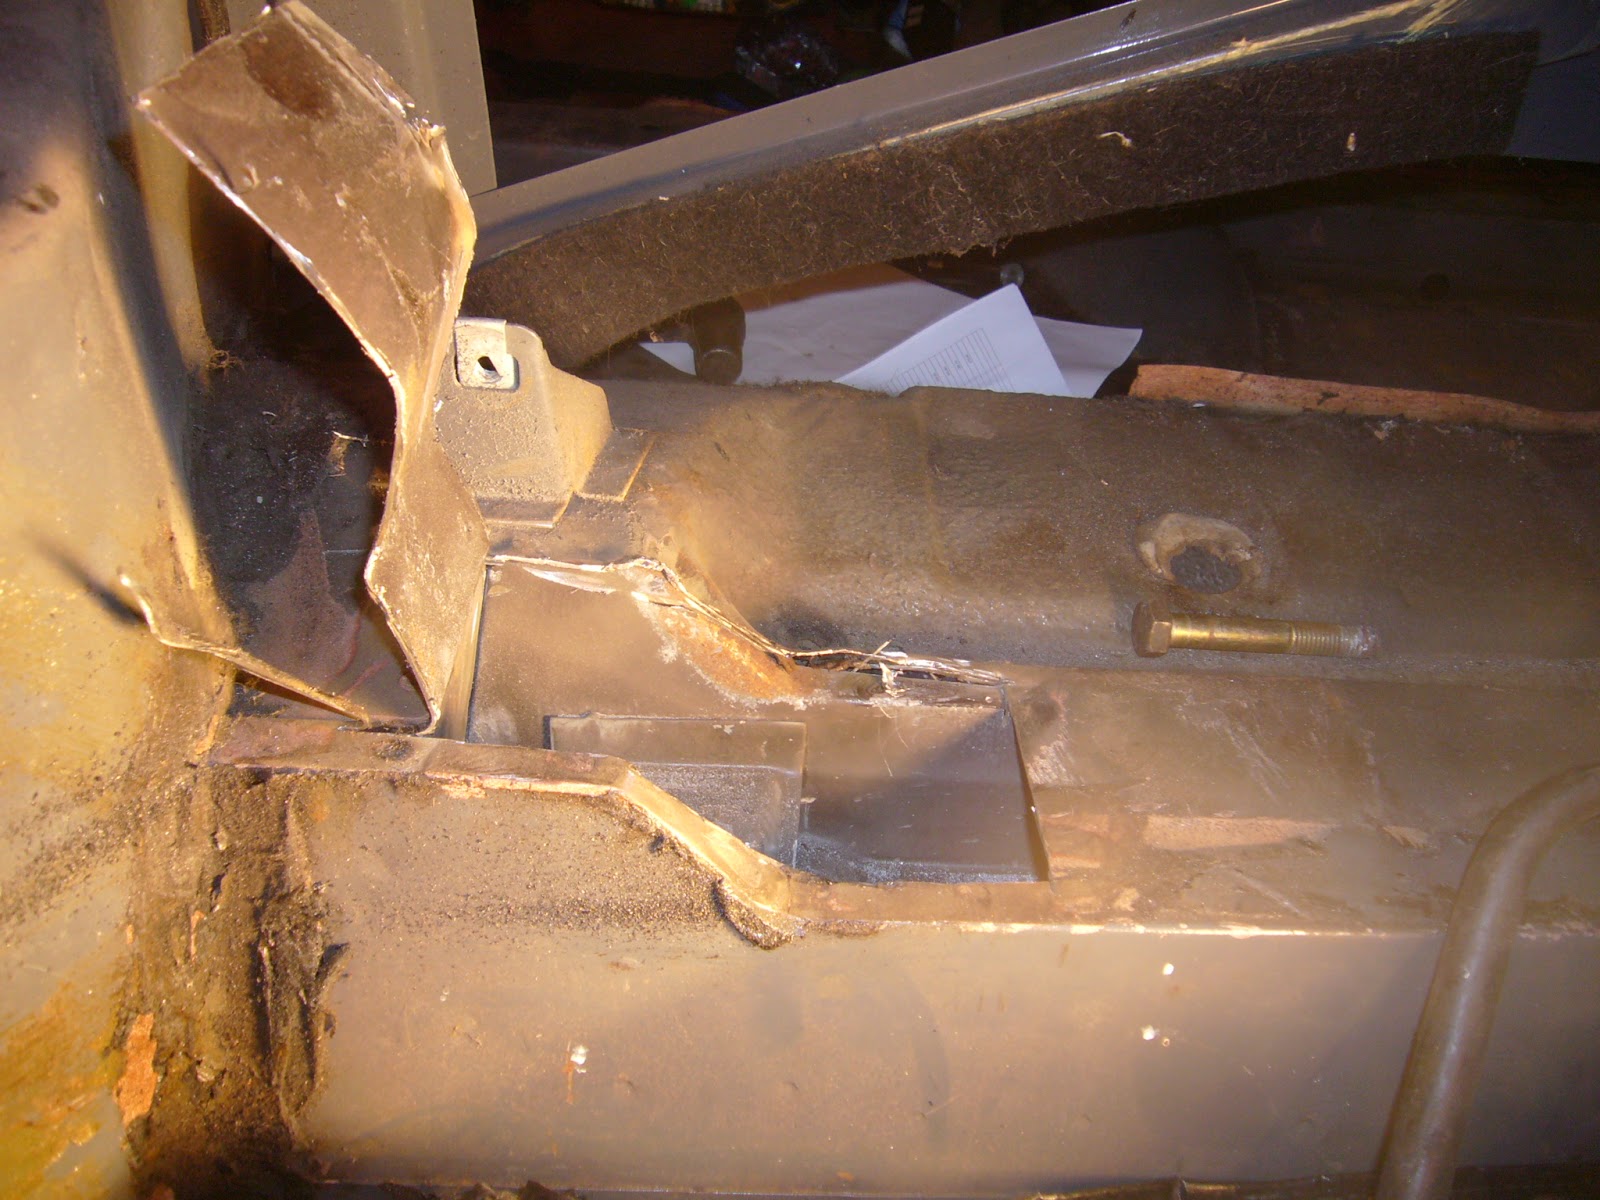
With this done we then had to try and get into the above hole with a grinder to try and cut the two welds holding the head of the pin onto the metal work. This was easier said than done but we eventually broke it free. We then cut the pin off from underneath and then ground the metal back until the weld had disappeared. We were then able to punch what was left of the pin out of the hole.
Once the pin was removed it was quite alarming how much of it had worn away. It also made me wonder how many other big saloons are driving round in this condition without the owners realising it. The new pin is now sitting in place but proper fitment will have to wait until a new gun for my welder arrives. I also have the 10CR to contend with shortly, so I doubt much will be done now until I return.


Monday 26 August 2013

Bank Holiday Weekend 24-25-26th August.

Driving the red car home on Thursday evening I became aware of her running sick and a distinct smell of petrol whenever I stopped. With petrol being the ridiculous price that it is immediate investigation was required.
It turned out that the rear carb was leaking. I removed the carb and then the float chamber. For some reason the floats had become detached on one side and was leaving the needle valve open. What I discovered was that if the pin for the floats is put into the holder the wrong way round, there is room for it to slide out and release the floats into the chamber. By turning it round this prevented this happening.
So this should have been an easy fix. However, during the reassembly I must have managed to break one of the lugs that the pin slots into somehow. Bugger!
 
A quick phone call to Colin Wake had him searching in his spares and as a result a trip to North Essex/Suffolk land on Friday night saw me collecting a spare carb body and a decent, although somewhat multi-coloured bonnet for my estate.
Saturday morning saw me strip my existing carb of spindles, springs and all other tiny pieces and refit them onto the new carb body. After reassembly I was surprised to see that the Red beast started up with no issues. I hadn't lost any parts or fitted anything wrongly! Blimey!
The rest of Saturday afternoon was spent trying to stop my garden and garage from flooding from the torrential rain we were getting after getting saturated I called it a day and went indoors without even taking the red car for a test drive.
 
Sunday 25th
 
A bit of a quiet day on the car work front today as I had been offered a place on the Club stand at the classic car show at Knebworth. I had planned to run down with Darren Sharp in his MK2, but me being very late and not leaving Wickford until ten past nine I ended up going there alone. 
A good run down the M25 (all at legal speeds officer!) with no traffic and I was on the show field by 10am.
The day started off very grey but by afternoon  the sun had made an appearance and it turned into quite a lovely day. It was a nice day out but I made tracks about 4pm as I still had to get home and prepare Gertie for some welding work the next day.

Monday 26th.
 
James Cooper came up today to do the welding on Gertie for me. Things were going well until my welder packed up, but luckily Davemate very kindly brought his one up for us to borrow.
Once this arrived the job didn't take long, but we discovered a real horror while underneath.
One of the differential pins has worn away to half its original width. These pins are buried inside the rear crossmember, so the only way to do them properly is to cut a large hole in the subframe to gain access, cut the old one out, and weld a new one in. It also means draining and removing the fuel tank. (Which I did this afternoon) More work that I really don't have time, or money at present to do. Looks like Gertie will have to sit on the back burner for a while until funds allow.


Wednesday 21 August 2013

Saturday 17th August. Bits & Pieces

A few jobs on the list this weekend so no time was wasted getting stuck in once I’d finished my chores Saturday lunchtime.
First job on the agenda was to reinforce the differential casing in readiness of Gertie’s return to the road. I had cut and shaped some pieces of metal during the week, so they were already to be welded in place. I encountered a bit of a problem in that despite my gas bottle showing half full on the gauge it was in fact empty! This was particularly annoying as my gas supplier (Allied Welding Supplies in Benfleet) were now closed.  I had already been over there in the morning buying some wire brush attachments, so I could have exchanged it then if I had known.  
Luckily Gavin had called in and offered to go home and get his arc welder to do the job. With this done the job was soon completed and I no longer have to worry about Gertie’s torque bending the diff casing.
 
While Gavin was welding I decided to have a play with my new helicoil kit. Two of the studs on the trailing arms had pulled out of the alloy and there was no thread left in them to tighten against. The kit allows you to drill out the existing hole, then re-tap it and then insert a new thread piece in which the stud can be inserted. I had never used one of these kits before and was quite impressed with how well it works. Now Gertie's trailing arms have all six studs fitted as Triumph designed them. Result!

After this Gavin helped me remove the remains of the diff from the car so it will be easier to fit the new seal that’s arriving soon. It also now leaves the rear of the car completely without any rear axle so access to the part of the floor that needs welding will be easier too.
While Gavin was still around we had to go at lining up the bonnet on my Mk2 estate. For some reason this now refuses to open and close without making contact with the front panel. After trying various different things we still couldn’t get it to make any difference. Close inspection of the bonnet hinges revealed that one of them has pushed itself into the bonnet due to much rustiness! Bugger! Now I’m going to have to find another Mk2 bonnet.
Last job of the day was re-torque the cylinder head on the Red car now that it’s got a few miles under its belt. This is a bit of a pain because with the Mk1 engine the right bank of head bolts are external, which means you have to remove the inlet and exhaust manifolds to get to them. However, what with recent head removals I’ve done on this car I’ve become a bit used to it and I had it all done in just over the hour.


Tuesday 13 August 2013

Saturday 10th August. Windscreen Removal

Saturday morning saw an early start and a drive up to Colin Wake's place in Suffolk. More parts were being collected for Gertie and Colin also showed me how to remove the bearing from the quill shaft on my differential.
Although the bearing seemed fine, Colin agreed with me that there was a lot of resonance going through the casing when the shaft was in motion. Possibly caused by a bent quill shaft.
Once home the next plan was to remove the front windscreen from the Red car and inspect the metalwork behind it. I had taken her to the drivers meeting for the 10 countries rally the Monday previous in the torrential downpours.
To say that she leaked was an understatement. I had never driven this car in the rain and I couldn't believe how much water was pouring in! I only needed a few rocks and some plants and I'd have had an in car water feature!
When I arrived at the Plough I looked like I'd been standing in two buckets of water much to everyone's amusement.
Following this I had arranged for somebody to come to my work place the following Monday to fit a new windscreen rubber, but with the leak being so bad I was worried that the metal behind the windscreen was rotten and they wouldn't be able to refit it once they had taken it out. So we took the screen out Saturday afternoon so we could cancel them if we needed to. Luckily, the metal behind the screen was like brand new so it was put back in, secured with gaffa tape and left ready for the new rubber.

Thursday 8 August 2013

Wednesday 7th August. More disection

I finished work at a reasonable hour tonight, so I decided to do a bit more on the ‘Gertie improvement programme’. (Lots more new parts and shiny bits to come over the next few months!-Watch this space!)
The first job however, was to readjust the valve clearances on the Red car. (See? I didn’t call it a shed!) Looking closely at the valves and rockers I spotted what turned out to be a broken washer. Luckily it hadn’t broken small enough to drop into one of the cam followers or anywhere else so I was relieved about that.
With the tappets quickly done I refitted the rocker cover and turned my attention to Gertie.
When I removed the nearside rear subframe yesterday I remembered that the exhaust bracket was broken. Mk1 subframes are becoming rare now, but I’ve managed to source a Mk2 pair with the better exhaust mounting.
I then decided to remove the other side too. The subframe bolt on this side was a real pig to undo because it was seized solid and I ended up cutting the damn thing off with an angle grinder.
Now that both subframes were removed I then removed the propshaft and the quill shaft. I was going to send the propshaft away to be checked for balancing. The reason for this was because the car gets a vibration that starts at 70mph and gets progressively worse. However, close inspection of the quill shaft revealed a somewhat knackered bearing. Spinning it manually showed that it doesn’t rotate freely at all. I’m quite convinced that this will be the cause of my vibration. Lets hope so. Now that Gertie is high in the air with more or less no back axle in her I need to get this welding done as I can't put it back together until it is.  I also found more welding that needs doing on the handbrake mounting, but this doesn’t look too serious.


Tuesday 6 August 2013

Tuesday 6th August. I've broken Gertie. :(

I needed to do some investigation work today as I noticed a couple of things not quite right with Gertie when I was hacking....I mean driving her sensibly at the weekend.
The first thing was a strange banging noise underneath while accelerating hard. I had witnessed this noise in the estate before and it turned out to be a broken gearbox mount. So, obviously this was the first thing I looked and sure enough it was just that problem. Luckily I had one in the spares box, so it was dusted off and promptly fitted.
The next investigation was the nearside rear wheel. For some time now I had noticed that the nearside rear wheel had more negative camber than the offside. They both have anyway due to the lowered springs, but they should both be at the same angle.
Anyway, close perusal of the rear suspension bush mounting made me remove the back part of the exhaust, the driveshaft, spring, trailing arm and finally, the differential arm. What I found there didn't please me I have to say. It looks like a poor repair has been made there at some time in the past and the floor is now cracked and split and possibly being pushed up further than it should. Hence the negative camber. More welding and fabrication work required then!


Monday 29th July. New parts for Gertie.

A new parcel arriving in the post today meant that Gertie's new rear shock absorbers had finally arrived. I had been advised on the MOT (too many months ago that the nearside one had started leaking and that it should be changed 'soon'.
Within an hour or so the new shocks were fitted and a test drive settled them down nicely. I chose standard shocks over uprated one as Gertie has quite a nice ride with uprated springs and standard shocks and I don't want to lose that.